A person who has not read and understood all operating and safety instructions is not qualified to operate this appliance. All users of this appliance must read and understand this Instruction Manual before operating or cleaning this appliance. When using electrical appliances, basic safety precautions should always be followed, including:
ADDITIONAL IMPORTANT SAFEGUARDS
SAVE THESE INSTRUCTIONS!
Thank you for purchasing the ELECTRIC ICE CREAM MAKER WITH CANDY CRUSHER from Nostalgia™! This unique ice cream maker provides a homemade ice cream experience with modern convenience. Simply surround your ice cream mixture with rock salt and ice, and let the electric motor do all the churning. When it's just about ready, crush up your favorite candy pieces using the Candy Crusher to make an extra unique and delicious ice cream flavor! Makes up to two quarts of ice cream per batch.
Visit www.nostalgiaproducts.com to find out which kits and accessories are available for this product!
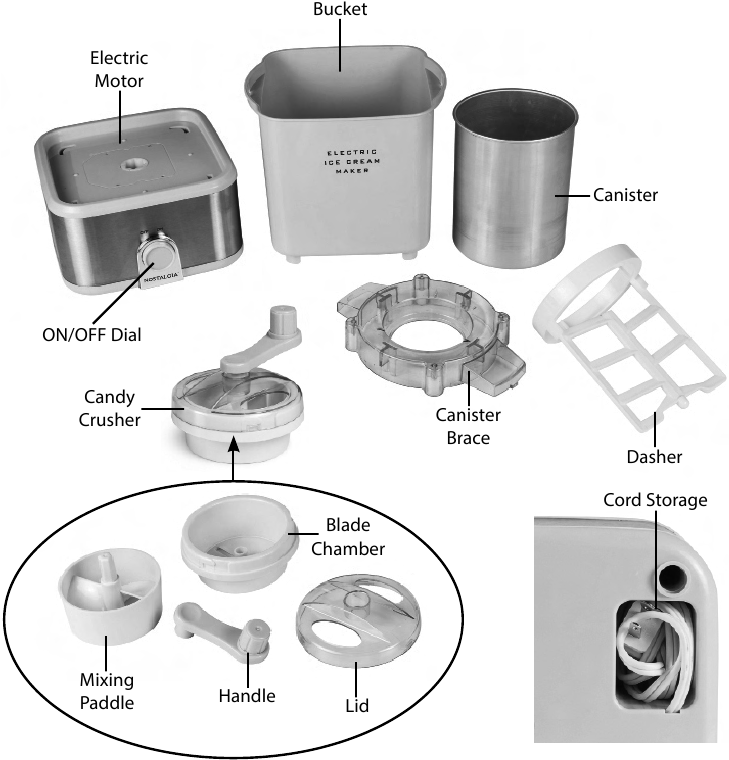
(figure 1)
Before first use, follow the directions under CLEANING & MAINTENANCE to wash your ICE CREAM MAKER.
Finished ice cream will always taste less sweet than the initial mixture. You may adjust the amount of sugar in the recipe to suit your taste.
Artificial sweeteners may be used in place of sugar. Use the following measurements for reference:
To ensure that ice crystals do not form in ice cream mixture, do not stop the churning process at any time until the ice cream is ready.
If the texture of ice cream is hard or grainy, make sure that you do not have too much rock salt in the ice water. Too much salt can cause the mixture to freeze too quickly, which can also cause ice crystals to form in the ice cream.
Homemade ice cream generally has a thick, milkshake texture. If you prefer a thicker, or firm consistency try one of the following:
If the Dasher gets jammed or Electric Motor stops prematurely, try the following:
Freezing
The ELECTRIC ICE CREAM MAKER makes rich, creamy ice cream anytime! Try these delicious recipes and tips:
In a large mixing bowl, combine milk and condensed milk.
Dissolve the cocoa in a bit of hot water.
Once dissolved, stir cocoa into the milk mixture until completely blended.
Pour ingredients into the Canister and follow directions in HOW TO OPERATE section.
Do not fill the Canister more than ²/3 full, as the mixture will expand during freezing.
Combine all ingredients in Canister.
Do not fill the Canister more than ²/3 full, as the mixture will expand during freezing.
Stir well until sugar has dissolved.
Freeze until Canister is cold to touch.
Follow directions in HOW TO OPERATE section.
Mix the sugar, corn starch, and salt in a large saucepan over medium heat.
Slowly pour in the milk, stirring constantly until the milk begins to simmer.
Very slowly add the beaten eggs and continue to stir.
Reduce heat to low and cook until mixture thickens slightly.
Slowly stir in the melted chocolate and whisk until all chocolate is combined and mixture is smooth.
Slowly add vanilla, half and half, and heavy cream.
Pour into a large glass bowl and refrigerate for 2-4 hours or until mixture has chilled. Remove from refrigerator.
Pour ingredients into the Canister and follow directions in HOW TO OPERATE section.
Do not fill the Canister more than ²/3 full, as the mixture will expand during freezing.
Mix the sugar, corn starch, and salt in a large saucepan over medium heat.
Slowly pour in the milk while stirring constantly.
Very slowly add the beaten eggs and continue to stir.
Reduce heat to low and cook until mixture thickens slightly.
Slowly add vanilla, half and half and heavy cream.
Pour into a large glass bowl and refrigerate for 2-4 hours or until mixture has chilled. Remove from refrigerator.
Pour mixture into the Canister and follow directions in the HOW TO OPERATE section.
Do not fill the Canister more than ²/3 full, as the mixture will expand during freezing.
Place the cookie dough and the chocolate chips in a separate bowl. Cover and chill until cold.
Whisk the eggs in a mixing bowl 1-2 minutes until light and fluffy.
Slowly add sugar, whisking until completely blended.
Slowly add cream and milk and whisk until blended.
Pour mixture into the Canister and follow directions in the HOW TO OPERATE section.
Do not fill the Canister more than ²/3 full, as the mixture will expand during freezing.
When the mixture has finished churning, add cookie dough and chocolate chips and stir in evenly.
Mix the milk and chocolate chips in a large saucepan over medium heat until the chocolate has completely melted.
Remove from heat and slowly add sugar and salt, mixing well, until dissolved.
Stir in the remaining ingredients except the marshmallows, pecans and chocolate chips.
Cover and refrigerate for about 30 minutes or until mixture has chilled.
Pour mixture into the Canister and follow directions in the HOW TO OPERATE section.
Do not fill the Canister more than ²/3 full, as the mixture will expand during freezing.
When mixture has finished churning, add marshmallows and pecans, and stir in evenly.
Mix the sugar, corn starch, and salt in a large saucepan over medium heat.
Slowly pour in the milk while stirring constantly.
Very slowly, add the beaten eggs and continue to stir.
Reduce heat to low and cook until mixture thickens slightly. Slowly stir in peanut butter and whisk until all peanut butter is combined and mixture is smooth.
Slowly add vanilla, half and half, and heavy cream.
Pour mixture into a large glass bowl and refrigerate for 2-4 hours or until mixture has chilled. Remove from refrigerator.
Pour mixture into the Canister and follow directions in the HOW TO OPERATE section.
Do not fill the Canister more than ²/ 3 full, as the mixture will expand during freezing.
When mixture has finished churning, add chocolate chips and stir evenly.
Combine all ingredients in Canister.
Do not fill the Canister more than ²/3full, as the mixture will expand during freezing.
Stir well until both sugar and instant coffee powder have dissolved.
Freeze until Canister is cold to touch.
Follow directions in HOW TO OPERATE section.
Finely puree the pineapple in a blender with apple juice and water.
Strain mixture into a large saucepan to get a smooth consistency.
Add sugar to the pineapple mixture, bring to a boil for 3-4 minutes. Stir in remaining juices.
Pour into a large glass bowl and refrigerate for 2-4 hours.
Pour mixture into the Canister and follow directions in the HOW TO OPERATE section.
Do not fill the Canister more than ²/3 full, as the mixture will expand during freezing.
Finely puree the berries in a blender with apple juice and water.
Strain mixture into a large saucepan to remove seeds. Discard seeds.
Add sugar to the seedless berry mixture, bring to a boil for 3-4 minutes. Stir in remaining juices.
Pour into a large glass bowl and refrigerate for 2-4 hours.
Pour mixture into the Canister and follow directions in the HOW TO OPERATE section.
Do not fill the Canister more than ²/3 full, as the mixture will expand during freezing.

Here you can download full pdf version of manual, it may contain additional safety instructions, warranty information, FCC rules, etc.